A complete guide for conducting oral history interviews for storytelling.
Of all the various opportunities I have to research and write narratives, the most important and productive research was when I conducted oral history interviews. When we talk about the oral history interview, we closely associate the topic with writing individual and family narratives. In this “Complete Guide for Conducting Oral History Interviews for Writing Narratives,” I will present the oral Interview and oral history as one topic under the umbrella of oral history.
The difference between writing mediocre and a great narrative is planning, researching, and carefully stitching the memories and artifacts into a cohesive blend of resources to tell the story that will inspire generations to come.
In the beginning. Shortly after my mother’s passing 25 years ago, I began the process of conducting interviews with her (Mary’s) immediate family, friends, and others who knew her. As time continued, I expanded the oral history research to include my mother’s and father’s immediate and extended family. When I completed the task 4 years later, I had gathered information spanning 100-plus years of memory, 160+ hours of interviewing, have received physical or digital copies of thousands of family images, writings, and artifacts related to those interviews. Throughout this guide, I will refer to some of my experiences in conducting these oral history interviews.
This guide is based on my personal and professional experience in interviewing hundreds of people and writing thousands of narratives over the last several decades. The following are the topics that will be covered in this guide:
- What are Oral History Interviews?
- What I Learned in the First Ten Oral History Interviews
- How to Begin Preparing for the Oral History Interview
- Oral History Interview Considerations
- How to Set-up the Oral History Interview
- How to Correct Oral History Recording Noise Problems
- Getting Ready for the Oral History Interview
- How to Conduct an Oral History Interview
- Use Open-Ended Questions in Oral History Interviews
- How to Get the Best Answers in Oral History Interviews
- How to Take Care of Recorded Oral History Interview
- Documenting Oral History Interview and Narrative
Other resources to consider include:
- Complete Guide to Writing A Personal Narrative
- 7,500-plus Questions About Life to Ask People When Writing Narratives
Every life is important and unique. It’s about the people known, the places visited, the decisions made, the opportunities lost or gained, and the spiritual, physical, and mental vitality and folly. If your life is essential to you for no other reason, and that is reason enough to write a personal narrative.
Please do not underestimate your value and how essential your narrative will be to you and those who will read it. So often, I have heard people say, “I wish that my grandparents had written a personal narrative/history,”? We have many questions about those who have gone before us. The narrative you write will be among the most prized possessions you give to others.
Return to list of topics for Complete Guide for Conducting Oral History Interviews.
1.What Are Oral History Interviews?
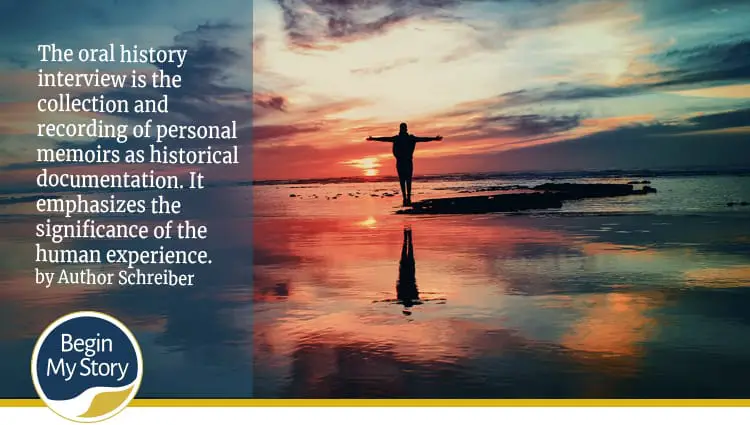
The oral history interview is the collection and recording of personal memoirs as historical documentation. It emphasizes the significance of the human experience.
Oral history interviews are not the best method for obtaining factual data—such as specific dates, places, or times—because people rarely remember such detail accurately. Instead, you will need to use more traditional historical research methods—courthouse records, club minutes, newspaper accounts, and so forth—to help fill in these gaps.
Oral history interviews are the best method to get an idea of what happened, what those times meant to people, and how it felt to be a part of that time.
Oral history interviews are great for capturing eyewitness accounts and reminiscences about events and experiences that occurred during the lifetime of the person being interviewed and for gathering narratives passed down verbally from generation to generation beyond any individual’s lifetime. This includes stories, songs, sayings, memorized speeches, and traditional accounts of past events.
Oral histories provide an added dimension to historical research. An oral history project can aid your research in the following ways:
- Foster appreciation for little-known or rapidly vanishing ways of life.
- Verify the historical nature of events that traditional methods of historical research cannot determine.
- Correct stereotypical images of life, ways, and people.
- Recover and preserve essential aspects of a human experience that would otherwise go undocumented.
What are the types of oral history interviews?
There are four basic types of oral history interviews. They include:
Life histories. These are oral interviews with individuals about their backgrounds from childhood to adulthood. Most of these oral interviews follow a chronology in time. Life histories provide an opportunity to discuss various subjects based on the interviewer’s interests and the interviewee’s remembered experiences and perspectives. They are ideal for writing narratives and learning about family.
Topical histories. These oral interviews are often used for focused studies of particular events, eras, or organizations. Examples include discussing the Depression Era in the local county/community or about an event like a flood, mudslide, or storm that devastated a community. An oral study about World War II in a specific locale, for example, might include interviews about military involvement, civil defense preparedness, the home front, rationing, bond and scrap metal drives, war industries, and myriad related topics.
Thematic histories. These studies focus on broad patterns and concepts. These themes could include love, conflict, hope, religion, education, competition, success, or art. Thematic oral histories are not common, but they present opportunities worth considering.
Histories to document specific artifacts or sites. Oral history interviews may be used, for example, to explain items within a museum collection— how to churn butter, how to operate a Farmall F-12 tractor, how to use a Victrola, how to dress for travel in the 1940s. Another method is to have a subject orally document the history of an individual home, a particular street, an old schoolhouse, a vacant field or an overgrown cotton patch.
Return to list of topics for Complete Guide for Conducting Oral History Interviews.
2. What I Learned in the First Ten Oral History Interviews

During my mother’s funeral and memorial services, I had many people tell me about their experiences with Mary as a youth, as an adult, and at work. They told me about her service and reshared her thoughts and pride for my siblings and me. I longed to know more about my mother. I realized that I knew very little about my mother. I felt a genuine sorrow and emptiness for wanting to learn more about my mother.
Whenever I asked Mom (Mary Schreiber) about her life while living, she replied that it was hard and nothing more needed to be said. Because of my need and desire to learn about my mother, I awkwardly yet earnestly began reaching out to people my mother knew to see if they would allow me to interview them about my mother. Every person gladly agreed. So within three months, I began conducting oral history interviews. The journey started with my conducting oral interviews with family, friends, co-workers, and my mother’s acquaintances. I expanded the project also to include discussions related to my father. Over six years, I conducted over 160 hours of oral history interviews.
The first ten oral history interviews were more than people simply answering my questions. They were individuals who had respect, love, and insight into Mary as a mother, friend, and sister. I was discovering the Mary Schreiber I was never privileged to know thoroughly. I loved my mother before, but I loved her even more following the interviews. This group of ten people held the keys to every stage of my mother’s life. They answered my questions honestly, directly, and without any reservation. As a result of the interviews, I learned about the following aspects of my mother’s life:
- Cherished experiences they shared with Mary
- Traits they admired about Mary
- Innermost thoughts Mary shared with them about her life and family
- Her dreams that were dashed by choices in marriage
- Dark, troublesome times of pain and sorrow that was triumphantly overcome
- My heritage and roles of progenitors in preparing a path for me
- Family rifts that were three generations deep
- Identification of photos and other artifacts
- Individuals and families from my heritage whom I should learn more about
- “Skeletons” that were long since buried
- Precious artifacts (photos, cards, letters, scrapbooks, journals) that were given to me to keep or to scan
- Artifacts that existed and where I could find them
There were two important takeaways from those first ten oral interviews for anyone just starting to conduct oral history interviews about individuals or family members. They include:
Conduct oral history interviews with immediate family members
Take time to interview and compare your memories with those who have direct knowledge about the person. This can include siblings, parents, cousins, grandparents, and others. Oral history is about people, who they were, and the stories of their lives. People often share that they want to learn more about individuals and their family heritage.
I will respond with questions like, “What is keeping you from talking to your family?” The replies vary from
- I don’t know how or where to start.
- I don’t get along with some of my family.
- I don’t have time.
- I will wait till I am retired.
I try to emphasize by sharing that those were my feelings exactly. Then I briefly share my experience with the death of my mother and my need to know more. I conclude by gently encouraging them not to wait until after a relative passes on to find information or conduct oral histories. Someone in the family has excellent information. People will and want to talk to you. Because you are willing to take the effort and ask questions, people will go out of their way to help answer your questions and share information and artifacts (e.g., photographs, letters, scrapbooks, journals, video, and more) related to your quest. Rest assured that your family will answer your questions and insights that will be invaluable to writing a narrative, story, or memoir.
Oral interviews provide opportunities to locate family records
Oral interviews provide opportunities to locate, identify, catalog, and preserve artifacts significant to the family and why those items are essential. Artifacts can include heirlooms (such as furniture, small collectibles, and photographs), manuscript materials (diaries, letters, and family bibles), and copies of public records (certificates of birth, marriage, death, land, patents, and wills.)
Of the more than 60,000 artifacts I have gathered relating to my mother and father and their ancestral lines, 75 percent have come from interviews with family. Once I was made aware of available information, I was permitted to scan or photograph the artifacts. In several instances, I was given the life-long research of the person I was interviewing because I had an interest shared by anyone else.
Return to list of topics for Complete Guide for Conducting Oral History Interviews.
3. How to Begin Preparing for the Oral History Interview
It is natural to want to rush out and start the interview process, but no project should begin without some essential investigation of available resources. I found that by gathering and organizing material, I was able to gain an excellent insight into which direction I should go and what questions I needed to ask. As you prepare, you may need to review other artifacts, such as old newspapers, county histories, archival records, cemeteries, and photographs.
Who should I include when writing an individual or family narrative?
Include family and friends of the person whose narrative you are writing. Involving family and friends in writing a personal, individual or family narrative will make the process more accessible (and the result more interesting). Still, it will also help ensure that you have an audience of interested readers connected to the completed work. Start the process of involving family and friends by sending them a letter or email signed by the subject of the narrative, if available. These communications are most effective if, at a minimum, they accomplish the following:
- Introduce the narrative writing project and explain the desired time frame for completion.
- Share that you will be reaching out over the next several months to request and schedule time for an oral history interview.
- Ask the recipients to collect photos, stories, and memorabilia that might be appropriate for use in the completed narrative.
- Offer to pay for any copies and other costs they incur in assisting you.
- Ask family members to contribute their favorite stories concerning the subject.
- If writing a letter, include a self-addressed, padded envelope and “advance reimbursement” for the out-of-pocket costs they will incur in assisting you.
Who should I interview for the narrative?
Start by creating an acquaintance list. For Mary, my mother, I brainstormed a list of family, friends, and acquaintances who I knew. The list started with 20 names. This will grow over time. As I conducted interviews, I was introduced to new people with whom I should meet.
Who should I interview first? I organized Mary’s list of family, friends, and acquaintances into the following three groups:
- Group One: Family and friends she spoke with often during the last five years of her life.
- Group Two: Family, friends, and acquaintances appeared (in artifacts) at critical moments in her life (for example, bridesmaids at her wedding).
- Group Three: Family, friends, and acquaintances in everyday activities with her, such as a friend’s birthday or a group picture in the cafeteria.
I began with Group One, which consisted of ten people. I prepared for the interviews by developing a few general, broad questions that would help uncover information about each period of my mother’s life and call each person to set up the Interview.
Return to list of topics for Complete Guide for Conducting Oral History Interviews.
4. Oral History Interview Considerations
Before I get into the actual details about how to set up and conduct oral history interviews, I would like to address essential choices such as
- Where to Conduct the Interview
- Type of equipment to consider and use
How many people should I interview at a time?
When you have an option, choose to interview the person in their own home. It is by far the best option, as the interviewee will be much more relaxed. A one-on-one interview is best. Privacy encourages an atmosphere of trust and honesty. A third person present, even a close partner, can inhibit and influence the free discussion.
Should I audio record or video record an oral history interview?
I would say that 85% of my interviews are done with audio recordings. When possible, I like to use both the audio recorder and video for interviews. However, the choice may not be yours. Sometimes, a person who is comfortably sitting and talking into a digital recorder will cringe at the thought of being on a video recording. If you’re uncertain, ask the interviewee. Whether using audio or video is more convenient for you, you’ll get the most from an interviewee who is comfortable with the environment. Getting their Interview is most important.
Do I need to record the oral history interview?
Because you can’t write down everything that someone tells you, it is a good idea to use an audio or video recorder. Over the years that I have conducted interviews, I have found that recording the Interview leaves me free to focus on the discussion. The only notes I took were thoughts that came during the discussion about further questions to ask or expand upon.
Your recordings will be unique historical documents that other people need to hear and understand quickly, so it’s worth getting a good-quality recording. When you record, you can focus on the Interview and worry about writing down notes and deciphering them later.
When should I conduct telephone oral history interviews?
I did say that the interviews are in person. However, I would say that 50% of my oral history interviews have been over the phone. Why? I simply lived too far away from the interviewee.
Recording an Interview via Telephone. The FCC protects the privacy of telephone conversations by requiring notification before a recording device is used to record interstate (between different states) or international phone calls. I always ask the interviewee if I can record the call and have their answer on the recording. If they say, no, then I shut off the recording. Interstate or international telephone conversations may not be recorded unless the use of the recording device meets the following requirements:
- Preceded by verbal or written consent of all parties to the telephone conversation; or
- Preceded by a verbal notification that is recorded at the beginning, and as part of the call, by the recording party; or
- Accompanied by an automatic tone warning device, sometimes called a “beep tone,” automatically produces a distinct signal that is repeated at regular intervals during the telephone conversation when the recording device is in use.
Also, a recording device can only be used to be physically connected to and disconnected from the telephone line or if it can be switched on and off.
What type of equipment do you need for a telephone oral history interview?
There are many ways and apps to use when recording a telephone call. I used the following equipment and resources for interviews because they have proven to the most reliable:
- A digital-cassette player like the Sony ICD-UX570 Digital Voice Recorder.
- A microphone that I could place under the earpad like the Olympus TP-8 Telephone Pick-up Microphone. The microphone is on the outside of the earplug.
- Headset like the Plantronics Blackwire C3220 Headset for clear communication. My headset is the “Plantronics Voyager Focus UC Bluetooth USB B825 202652-01 Headset with Active Noise Cancelling” which I use also use for work.
- List of questions for Interview.
- Note pad to record thoughts, requests, and promises.
- Computer to save my digital recording afterward.
Before each interview, I made sure the recorder worked and the lines were clear. If you haven’t used a recorder for interviews before, it is imperative that you practice recording and asking questions so you know your equipment and questions. That way, if you have any problems, you will have time to research and make corrections.
Can I use video conference software like Zoom for remote oral history interviews?
Yes. Zoom and other video conferencing software can be an excellent alternative to in-person and telephone-only oral history interviews. However, as the narrator/interviewer, you will need to have some essential practice on using the software and how to help the interviewee set up software on their end.
Pre-interview with Interviewee. Don’t assume you will set up an interview and jump on video conferencing software like Zoom and conduct a video oral history interview. While you may have had the experience of multiple interviews, your interviewee will not have had this experience. I suggest you set aside some time to become acquainted with the software and work out the technical aspects. Set up a pre-interview meeting with the interviewee. During the meeting, you can discuss how the interview will progress, set up both interviewer and interviewee computers, and make adjustments for sound, recording, camera, bandwidth speed of internet connection, and quiet room with little or no noise.
Choose a quiet, well-lit room. As the interviewer, you must find a quiet, well-lit, and relatively quiet room. The following is a checklist of considerations when recording.
- Room smaller than 12 feet x 15 feet. Home office or den with carpet or plush services.
- Make sure the room is well. I like having an incandescent or table lamp. I am looking to have a light that will show both sides of my face. Overhead lighting tends to leave dark shadows on a person’s face.
- Ensure your computer or another camera you are using does not face the window or direct light source. Close the blinds or find another space.
- Sound can bounce off walls and give you an echo effect. To reduce this effect, I like rooms with a mix of features like carpet, plush soft surfaces, plush/stuffed furnishings, bookcases, etc., which help to absorb sound.
- Listen for noise such as fans, clocks, refrigerators, animal sounds like barking, outdoor sounds (close windows).
- Close blinds or shield computer camera from direct sunlight.
- Listen for other sounds coming from other rooms that can be heard and affect recording quality, such as flushing toilets, feet on the wood floor, fluorescent lighting, walking upstairs, talking, animal sounds like barking, clocks, fans, refrigerators, and more. Where possible, seek to minimize these sounds like asking the family to be in a different room while you are recording, using a different bathroom, not running the lawnmower, taking off shoes, and so forth.
- Do not use artificial digital backgrounds. They look fake and can be irritating for the interview to watch.
- Check your background. Less is more. By this, I mean, stay away from busy backgrounds. A bare wall is ok, but a painting or bookcase on the screen is better.
Recording equipment. When you are conducting a video interview, you need to be aware it takes more than simply opening your computer and turning on Zoom or video conferencing software. Consider the following:
- Laptops with built-in cameras and microphones ideal. Tablets with the same configuration are also appropriate.
- I like to use headphones with a built-in mic. The headphones help block out sound, help me contrate on the interview, and improve my voice with the mic. For example, a headset like the Plantronics Blackwire C3220 Headset for clear communication. My headset is the “Plantronics Voyager Focus UC Bluetooth USB B825 202652-01 Headset with Active Noise Cancelling,” which I use also use for work.
- Listen for mic rub. This is where your mic rubs against clothing and delivers a scratchy sound. Avoid clothing with turtlenecks, large jewelry, scarfs, and large stiff collars.
- Shut off all apps on your computer. Close as many tabs as possible from your browser.
- A good quality Zoom or video conferencing call needs a minimum download/upload speed of 75/9 MBPS (megabytes per second). If you have connections, try turning off Wi-Fi devices in the home and minimize video streaming by others such as the TV, phones, etc. You can find your intent speed by doing a Google search on the term “Internet Speed Test.”
- Beware of internet bandwidth. Bandwidth has to do with how much information your internet can upload and download. Many neighborhoods run off the same cable provider internet system. Reduces speed can cause an issue like stalled video images, breakup voice, etc. If this is happening, consider moving your interview to a time in the evening when there is less internet use. If you have fiber optic connections, you should be fine.
- I use a digital record digital-cassette player like the Sony ICD-UX570 Digital Voice Recorder for backup and a microphone that I could place under the earpad like the Olympus TP-8 Telephone Pick-up Microphone. The microphone is on the outside of the earplug.
Interview. At the designated time you set up for the interview, join the zoom or video call you had set up. Before the interview, you should have had practice sessions of setting up the Zoom meeting, recording, etc. For more information about how to set up Zoom or other video conferencing software, do a Google search on terms like:
- Zoom for oral history interviews
- Zoom for interviews.
- How to set up Zoom for interviews
As a best practice, I will do one or more of the following methods to make sure I have a backup of the oral history interview.
- A digital-cassette player likes the Sony ICD-UX570 Digital Voice Recorder.
- A microphone that I could place under the earpad like the Olympus TP-8 Telephone Pick-up Microphone. The microphone is on the outside of the earplug. See recording equipment.
- On your laptop, use screen recording software to record the session.
What do I need to know about digital recorders?
Not all digital recorders are suitable for interviews. Avoid those that use proprietary software—for example, “personal recorders” that create files that can only be used with the manufacturer’s software. You are dependent on such software for listening to the sound and copying it. The typical price range for a digital recorder suitable for oral history is between $75 to $500. It comes down to the bells and whistles.
Minimum recording requirements for all digital media, including computers, are as follows:
- 44.1 kHz—minimum sampling rate
- 16 bit—minimum bit depth
Can I use an analog tape recorder for recording the oral history interview?
My personal choice would be NO. If I had this question in 2010, I would have said sure, go for it. In 2010, the recorders cost $50 to $100, those same microcassette recorders list for $300 to $600. I recently had to look for one such recorder to play 50 microcassettes that I had recorded at one time.
If you choose to use a tape recorder, you will still need to digitize the recording. Ensure you have a professional-quality tape recorder with an external microphone, and high-quality cassettes should be used. If you have a suitable tape recorder that has not been used for a while, take it to a technician for a maintenance check.
Features to look for in a tape recorder include the following:
- Controls that allow you to play the tape (PLAY), wind back the tape (REWIND), wind the tape forward quickly (FAST FORWARD), RECORD, STOP and EJECT
- A tape counter, which allows you to find your place within the tape by denoting a numerical location
- A jack socket for an external microphone
- Recording-level volume control allows you to adjust the volume at which you record
- A recording-level meter
- The option of using either a wall socket or battery power
- A jack socket for headphones
- A built-in speaker
How do I clean the recording head of a tape recorder? Cleaning your tape recorder with Isopropyl alcohol, which is 91 percent pure, applied with Q-Tips, will eliminate debris from all recorder parts that come in contact with the magnetic tape. Standard “rubbing alcohol,” which may contain some undesirable lubricants, should not be used because the ingredients may damage the rubber pinch-roller if applied regularly.
Cassettes tapes. The following are some tips to keep in mind when considering cassette tapes for recording your interviews:
- Use 60-minute cassettes for recording your interviews. They are thicker than the longer-playing ones and are less likely to stretch (and thus distort the sound) or break. Do not use 90-minute tapes or larger ones. Longer tapes are too thin and tend to bleed, stretch, or tear.
- Buy regular tapes, not metal or high-bias ones. The latter is designed for recording music and is too expensive for this purpose.
- It is a good idea to use cassettes put together with tiny screws in each corner instead of glue because if the tape jams or breaks, the case can be opened, the tape repaired, and the case put back together again. If you are using tapes without screws, you have to destroy the case to get to the tape if it jams or breaks.
- Use only name-brands of cassettes, such as Sony and TDK.
What should I use for microphones when conducting an oral history interview?
Whatever recorder you decide to use, it is essential to use an external microphone. If you are buying microphones, go for the best quality you can afford. An external microphone is preferred over one built into the recorder. A built-in microphone will record all sounds indiscriminately, including the noise made by the recorder itself. It is challenging to position a digital recorder with an inbuilt microphone to record all voices.
If you are buying only one microphone, you will need one with a stand, not one that has to be held. Hand-held microphones record any sound of the mic itself moving. Free-standing or table-top microphones are generally relatively unobtrusive and record both the interviewee and interviewer clearly if they are placed carefully. However, they often pick up an undesirable level of background noise.
Microphones pick up a range of noise in four patterns. The different types are as follows:
- Unidirectional or cardioid, which picks up sound in a heart-shaped pattern in one direction. They generally record the sound around them but not directly behind them. These are the best type to use.
- Omi-directional, which picks up sound coming from all directions.
- Bi-directional, which picks up sound from two opposite directions.
- Hyper-directional, which picks up sound from one direction only and has a very narrow field.
Microphones for indoor recording. For one-on-one interviews indoors, the best microphone is a small tie clip or lapel microphone. Lapel microphones tend not to record as much background noise as free-standing ones because the wearer’s body helps to absorb unwanted noise. Their only disadvantage is that most recorders do not have an input for more than one microphone, so while the interviewee is recorded clearly, the interviewer sounds very distant. There are two solutions to this problem: buy a recorder with two microphone input jacks, or buy a “split cord” which allows you to plug two microphones into one cord and then into the recorder. If your recorder is stereo and has two microphone sockets, you can get two microphones—one for your interviewee and one for yourself. They can be attached discreetly to your clothing and give excellent results.
Microphones for outdoor recording. For interviews done outdoors, a unidirectional (or cardioid) hand-held microphone is best, as it will pick up less unwanted noise. The ideal for interviews is to use two lapel microphones that clip onto the clothing of the interviewer and the interviewee. Electric condenser or dynamic microphones are perfect. Talk to someone at your local electronics shop (such as Radio Shack) or contact a manufacturer to determine what model would be best for your requirements. Tell them you will be recording voices, not music.
Should I use batteries, wall plugs or others with my recorder?
Most digital records come with an internal battery that will last for several hours. Make sure you bring along a way to recharge your recorder. Even better, bring an extra recorder if you can afford it if the one you are using fails for any reason.
If you use a recorder that uses batteries and has a wall plug adaptor, uses the wall adaptor first, allowing you to plug your recorder into an outlet. If you have to use batteries for your recorder, you will need a battery tester to ensure they are fully charged. I make it practice to fresh batteries for every Interview. If they are not fully charged when recording, the tape will slowly wind through the machine. When you play the recording at average speed, the voices may be distorted.
What more important, saving on batteries or getting a great, clean recording?
What should I use to carry my recording equipment?
A padded bag, such as a camera bag, helps carry your equipment and protect it from damage.
Return to list of topics for Complete Guide for Conducting Oral History Interviews.
5. How to Set-up the Oral History Interview
The best way to approach someone you want to interview is by personal contact rather than by letter, and often the initial contact will be by telephone. This allows you to introduce yourself, explain your project, and outline the sort of topics you might cover in your conversation. The person you have approached may be uncertain or might feel they have nothing interesting to say, so you sometimes have to do a bit of persuading. The key is to talk in terms of “a chat about the past” or a “share a story” rather than an “interview,” which can sound intimidating.
How do I ask someone about participating in an oral history interview?
Once you have chosen the individuals with whom you would like to interview, I suggest you telephone them first. Only email them a second resort. Why? I find it much more personable to talk and have a conversation. If you can call or email, then send a letter. When I was working on my mom’s narrative, I sent emails to people and shared that I would like to speak with them about a story I was writing about my mom. I did not have anyone refuse to talk to me.
When you can talk to the potential interviewee, do the following:
- Introduce yourself.
- Explain why you are doing the project. Suppose the interviewee is a member of your family or someone you know very well. In that case, you will still need to explain the project, get their Agreement to record an interview, gather biographical information from them, and explain the other details listed here.
- Explain what you will be covering in the Interview.
- Explain that you would like to record the Interview.
- Explain what will happen to the Interview once you have finished it.
- Make an appointment to conduct the Interview and record it, preferably within a week.
- Explain your desire to find photos, documents, and so forth to help tell the story.
- Request their address or email address so you can write to them after they’ve had a few days to ponder your questions.
- Give the interviewee your name and phone number to contact in case they need to clarify anything else.
Note: If the person does not wish to be interviewed, thank them for their time. Do not try to persuade them to change their mind. Every time I had coaxed someone to interview when they first said no, I had had a less-than-acceptable interview.
How do I prepare for the oral history interview?
Preparing for an interview—whether it’s ten minutes or all day in length—requires careful planning, research, familiarity with your equipment, and establishing a good rapport with the interviewee. Consider the following as part of your preparation:
- Practice a couple of interviews before the real thing. Before you start recording, make at least one practice interview, preferably with someone you know, so that you are not afraid to make mistakes. This will give you practice in interview techniques and help you become confident in using your equipment. Practice setting up your equipment quickly and efficiently.
- Take the time to experiment with different recording levels on your machine and change the distance of the microphone from the interviewee so that you know the optimum positions for recording. You aim to make recordings in which both the interviewee and the interviewer are audible, with little unwanted background or tape noise.
Tip: Take some time to watch or listen to how professional interviewers conduct interviews on TV and radio. One of my favorite interviewers is Terry Gross of Fresh Air from NPR.
Return to list of topics for Complete Guide for Conducting Oral History Interviews.
6. How to Correct Oral History Recording Noise Problems
When you record an oral history interview, you want your recording to be clean and crisp. Sadly, from my own experience, I have had too many recordings that marginal at best because of simple things that have muffled and distort the voices. I want to share what I have learned about recording and address common noise problems that can affect your oral history interview quality.
Listed below are some common noise problems and suggestions for their solution.
Hiss. It could be your air conditioning or fluorescent lighting. It could also be caused by recording at too low of a level. Turn up your recording-level volume. It can also be read the instructions carefully.
Hum. The microphone may be too close to the machine and pick up the recorder’s mechanical noise. Move the microphone away from the machine. Alternatively, the machine and microphone may be too close to a power source or near another electrical appliance. If so, move the machine and microphone. The wiring on your machine or microphone may be faulty. Have them serviced if you think this is the problem.
Whistle. This could be that you are too close to a speaker. Sound is being transmitted, amplified, and coming from the speakers, albeit low.
Distortion. Having the level set too high when recording digitally can cause clipping, unwanted distortion of the audio. While distortion happens in analog recording, the artifacts caused by digital distortion can be more severe.
- A popping noise when people say “p,” a whistle when they say “s,” or a sizzling noise when they say “t” occurs because either they are speaking too close to the microphone or the recording volume is too high. To fix these problems, change the microphone’s angle, move it further away, or turn down the recording level.
- If you are recording someone with a high-pitched voice, you may need to adjust the recording volume.
Echo. This results from recording in a room with few soft furnishings and no carpet, such as a kitchen. Because there is little to absorb it, the sound bounces off the hard surfaces and is re-recorded.
You can get around this problem by moving the microphone closer to the interviewee, placing it on a cushion to absorb the echo, drawing the curtains, or moving to another room. A lapel microphone is helpful because the interviewee’s body will absorb a lot of echoes.
The effect will prevent broadcast-quality recording but is acceptable for research purposes.
Microphone cable noise. This is crackling or clicking noise on the tape caused by the movement of the microphone cable, which usually happens if you are holding the microphone.
It is best to use a microphone stand while recording. Alternatively, place the microphone on some magazines or a cushion. If you have to hold the microphone while recording, wrap the cable around your hand.
Cable noise sometimes occurs when you use a clip-on microphone and the interviewee fidgets with it. If this happens, explain politely that this will muffle their voice on the recording and ask them to stop. You may wish to give them something else to play with; a rubber band is an ideal toy for restless fingers, as it makes no noise.
Recording outside. You should avoid interviewing outside because it is almost impossible to control the recording of background noise.
If you cannot avoid recording outside, you will need some sort of windshield for the microphone, either a foam-rubber one you can buy or something like a handkerchief or a few layers of muslin secured with a rubber band.
Try to place the recorder on the ground or a wall, as the motor speed may vary if it is hanging from your shoulder, causing the sound to be distorted when you replay the tape.
Other sounds to avoid include rustling paper, clicking pens, fluorescent lights humming, clocks are ticking, traffic noise, caged birds, dogs barking, and open fires. To avoid the first two, use a pencil and write your questions and notes on a notecard rather than paper. There is little you can do about the others except notice them at the preliminary meeting and suggest recording the Interview in another room.
If you deliberately record some of the above effects when practicing with your equipment, you will hear how irritating they sound when the tape is played back. You will then realize why you need to make an audible recording for interviews, mainly if you collect for an archive.
Return to list of topics for Complete Guide for Conducting Oral History Interviews.
7. Getting Ready for the Oral History Interview
The difference between writing mediocre and a great narrative is planning, researching, and carefully stitching the memories and artifacts into a cohesive blend of resources to tell the story that will inspire generations to come. You are in charge of the Interview. The Interview will be as good as your preparation.
Should I try to conduct the oral history interview in one setting?
Yes and no. Most of the oral history interviews I did to write my mom’s narrative lasted between 45 and 90 minutes.
When I interviewed my dad, I lived in a different state. I asked my dad if I could set up a series of telephone interviews that I could record. I chose to break up the Interview into 10 60- to 90-minute sessions over six weeks. Each talk focused on a different time or topic of his life. At the end of each Interview, I outlined what I wanted to cover in the following Interview to give my dad time to ponder what stories he wanted to share. During our interviews, he shared many personal stories that I had never heard. We laughed, cried, and shared many precious and tender moments.
Do you ask all the oral history questions on your list?
I try to make sure that I give the person I am interviewing a list of the questions before the interview, so they have time to think.
Did I ask my parents and others the questions exactly as they listed as I had them? No. I used the questions to begin our discussion and explore the stories they wanted to share. I would encourage you to make these questions your own and personalize them with the person you are interviewing. When you are ready to conduct an interview, have the questions to get the information you desire. Family conversations can go in many directions. When possible, with the permission of the person you are interviewing, record the Interview on audio or video.
Some of the best things you find out will be unexpected. Once you get started with the Interview, you are likely to be told some things you had not previously thought about, so it is essential to give the person you are recording plenty of space to tell you what they think matters. But you should not let the interview drift: it is your job to guide it. For this, you need an overall plan. Group the topics you want to cover logically. I like the chronological structure, such as talking through life stages in order. I have provided examples of questions organized by life stages to preview and download from the companion website.
What kind of last-minute preparations do you do for an oral history interview?
It’s now the day before your Interview. Take time to do a quick check of the material, equipment, and artifacts you will take with you to make sure you’re all set. A simple checklist might help make sure you have all the equipment you need. Ensure that everything is in good working order. Check that you know how to operate all your equipment correctly and fresh batteries or an adaptor. Put together a folder containing maps, additional questions, a notepad, pencils or pens, and interview agreements (if you are using them).
Review the questions you have developed and choose which would be most appropriate for each person and whether there are other questions you should be asking specifically about the family line the person belonged to (such as grandparents, times in which they lived and so on). Then send each person a letter or email with the following information:
- Your name, address, email, and telephone number
- A brief overview of the project
- Questions you are going to ask
- A request to share artifacts
Return to list of topics for Complete Guide for Conducting Oral History Interviews.
8. How to Conduct an Oral History Interview
Up to now, I have talked about getting ready for the oral history interview. In this section, I will introduce how to conduct an oral history interview.
Where should I set up an in-person oral history interview?
Choose a quiet place. Try to pick a room that is not near a busy road. If you can, switch off radios and televisions, which can sometimes make it difficult to hear what someone is saying.
What should I say in the oral history introduction?
Before you begin the interview, explain to the person that not all of the information provided will be used in the family history. They will have an opportunity to see and approve it before being published or distributed to other family members. Explain that you will ask questions to prompt ideas, but they do not have to answer all the questions. If a question seems too personal, have them let you know and then move on to the next question; if they tell you something they later regret, have them tell you and let them know that you will exclude it from being used.
How should I set up my equipment and resources for the oral history interview?
It’s essential to make sure your equipment is set upright. Plug the recorder into the wall or put in the batteries. Switch it on. Put a battery in the microphone if it needs one, and plug it into the microphone jack socket. Turn the microphone on. Always check the microphone battery before going to an interview, and carry spare batteries at all times. I always put in fresh batteries for an interview. All you need to make you a believer is one experience where the recorder becomes slow or stopped, and you have to do the Interview over.
If using a tape recorder, make sure you have the tape in the right way, and remember that nothing will be recorded on the clear plastic lead-in at the beginning, so wait until it has wound through before you start talking. Alternatively, wind the lead-in tape through manually so that you can begin to record as soon as you press the “record” button.
Check that you have your recording volume adjusted to the correct level and your playback volume turned off. If you don’t, you may experience a shrieking noise called feedback. Check to see that you have copies of your questions and other pertinent material for the Interview. Place the microphone on the table or clip it to the interviewee. Press the “record” button or the “record” and “play” buttons, depending on your machine.
Remember that if your recorder has only a playback volume control, this does not control the recording level. You can adjust only by moving the microphone or speaking more loudly or softly.
If you have only one clip-on microphone, place it on your interviewee and speak up yourself. While it is more important to record their voice than yours, it is useless if the listener to the tape cannot hear your questions, making sure that your voice is also audible.
For a unidirectional tabletop microphone, the optimum position is for the two of you to speak over it at a 90-degree angle.
How close should the microphone be?
Generally, the closer the microphone is, the better the results will be. If possible, use a clip-on microphone and put it about nine inches from the person’s mouth. With a hand-held microphone, place it as near as possible but not on the same surface as the recorder nor on a hard surface, which gives poor sound quality.
Is there anything I should record before I start the oral history interview?
Before every interview, I will make sure that I provide some type of identification for the Interview. Why? Because it may be months before I will return to the recording to digest what was said. The following is a typical identification:
Interview with [Say the name and spell it.](say—Susan Longhurst, spelled S-U-S-A-N, New word L-O-N-G-H-U-R-S-T) 25 September 2021. Interviewed by Author Schreiber. [State purpose of Interview]
What are the best practices for conducting the oral history interview?
As I shared earlier in the Guide for Conducting Oral History Interviews for Writing Narratives, I have conducted hundreds of interviews. The following are just important best practices that I incorporate in my interview:
Be reassuring. You are their guest, and if they are elderly, you may be the first person they have spoken to for several days. They will be as nervous and apprehensive as you are, so it is essential to be cordial and patient.
The Interview is not a conversation. The point of the Interview is to get the narrator to tell her story. Limit your remarks to a few pleasantries to break the ice, then brief questions to guide her along. It is not necessary to give her the details of your great-grandmother’s trip in a covered wagon to get her to tell you about her grandfather’s trip to California. Just say, “I understand your grandfather came through the Panama Canal to California for his immigration in 1925. What did he tell you about the trip?”
One-on-one is best. Interviews usually work out better if there is no one present but you and the interviewee. Sometimes two or more interviewers can be successfully recorded, but usually, each one of them would have been better alone.
If you are using interview agreements, ask your interviewee to review and sign the agreement form before starting the Interview.
Begin the Interview with straightforward questions. Start with questions that are not controversial; save the delicate questions, if there are any until you have become better acquainted. An excellent place to begin is with the interviewee’s youth and background. For example, ask questions about the following topics:
- Date of birth and birthplace
- Names of parents
- Names of spouse and children
- Names of siblings
- Occupation, schooling
Ask questions that require a detailed answer. Early in the Interview, ask a question that requires a very detailed answer. After gaining the trust of the person you are interviewing, have some questions ready to signal to the person that you want details. Sometimes asking for a tour of a place, such as a house or place of work, helps gain much information. Ask follow-up questions with each “step” through the structure.
Return to list of topics for Complete Guide for Conducting Oral History Interviews.
9. Use Open-Ended Questions in Oral History Interviews

Throughout the Interview, the questions that will give you the best information start with how, who, why, what, where, or when. Ask specific questions to get specific answers and open-ended ones to get longer, more detailed answers.
What type of questions should I ask in an oral history interview?
I am a firm believer in using open-ended questions. Open-ended questions allow people to tell stories they want to share. An example of open-ended questions are:
- What did you like to do when you were a little girl?
- What did you do on your first date?
- Where do you like to go for a vacation?
- Who is your favorite author, and why?
- What some of your favorite experiences with your mom and dad?
As you develop your questions, use plain words and avoid suggesting the answers. Rather than saying, “I suppose you must have had a poor and unhappy childhood,” instead ask, “Can you describe your childhood?”
You will need some questions that encourage precise answers, such as “Where did you move to next?” But you also need questions that are open, inviting descriptions, comments, and opinions. Some examples of open questions include “How did you feel about that?” “What sort of person was he?” “Can you describe the house you lived in?” and “Why did you decide to change jobs?”
There are some points to cover in every Interview, such as date and place of birth and what their parents and their main jobs were.
I will address how to interview in later sections of this guide.
Where can I find oral history questions that have already been developed?
I have written a comprehensive 27 articles, 108 category series entitled “7,500-plus Questions About Life to Ask People When Writing Narratives.” The prompts and questions are provided to help you look at life from as many angles as possible when writing narratives about yourself, your family, and others.
Can you provide examples of oral history interview questions/outlines?
I like to break up questions into either period of life or by topic. Below is a sample outline of the interview questions I have used.
Married Life and Children
- Children:
• Names
• Dates and places of birth
• The health of the mother before and after
• How father fared
• Characteristics and differences
• Talents and hobbies
• Smart sayings and doings
• Growing up (daily routine in-home)
• Humorous episodes
• Problems
• Joys and sorrows
• Accomplishments - Child-rearing psychology
• Role of yourself, spouse, children in the home - Family traditions
• Holidays
• Birthdays
• Graduation
• Deer hunting
• Funerals
• Mother’s Day, Father’s Day
• Weddings - Family vacations
- Grandchildren
• How many
• Where they live
• How their parents raised them
• Things have done together
• Trips to visit them and vice versa
Middle Age and Toward Retirement
- General life pattern changing:
• More time on hand
• Financial situation
• Different and new interests
• New friends and associates
• New hobbies (genealogy, golf, reading, music, art, books) - Health
• In general
• Operations
• Allergies
• Physical disabilities - Decided preferences- favorite foods and so on
- Civic and political activities
• Positions held
• Services rendered
• Politics
• Political issues you were involved in
• Memorable campaigns
• Red Cross or other volunteer work
• Church positions - New business ventures: Memorable travels
- New and different homes
- Retirement and its impact
• Financial
• Family
• Leisure time
• Volunteer activities
Personal Philosophy about Life in General
- Your ideal-What personal trait do you admire most and why?
- Regrets-If you had your life to live over again, what would you do differently?
- One of the most important days of your life and why?
- The greatest joy and most enormous sorrow
- The biggest lesson in life you found to be true
- The most important lesson, message, or advice you’ve learned that you would like passed on for others to profit by
- One word on how to live successfully
- Your secret for living a long, healthy, happy, prosperous life
- Does the Lord answer prayers?
- How you would like to be remembered
- Funeral arrangements-music, speaker, ceremony, special instructions, headstone inscriptions, selection of burial clothes
- Unique words of counsel to:
• Children
• Grandchildren
• Other families
Return to list of topics for Complete Guide for Conducting Oral History Interviews.
10. How to Get the Best Answers in Oral History Interviews
In an oral history interview, there is an art to asking questions. It’s more than simply asking a question and then waiting for an answer. I found this out when I used the same set of questions to 5 siblings from the same family in 5 different interviews. For example, one of my questions was, “What was it like growing up in your hometown.” One sibling shared how wonderful it had been and all the activities and people who were part of their life. The other sibling, paused and with tears, shared how ugly the city had been for them because of the teasing, bullying, and living in the shadow of an older sibling.
What are some best practices for conducting oral history interviews?
As the interviewer, you are the one who is asking the questions. You are the one who asked for the Interview. I can assure you that not every Interview is going to be great. It is just the nature of interviewing. However, there a few best practices for conducting oral histories and asking questions that help you get the best answers possible. The following are some of the most important lessons I have learned.
Avoid simple yes-or-no questions. For example, ask, “What were your living conditions like?” rather than “Did you have cramped living conditions?” Ask open-ended questions if you want a description or comment: “What can you remember of the trip over to England?” or “Can you tell me more about what swimming in the Great Salt Lake was like?” Don’t ask more than one question at a time.
Get past stereotypes and generalizations. This is one of the most challenging aspects of interviewing people. As well as a mere descriptive retelling of events, try to explore motives and feelings with questions like “Why?” and “How did you feel?”
Ask for concrete illustrations and examples. If someone says, for example, “Aunt Marjorie was a great cook,” then ask, “Could you give me an example of that?” This adds depth and illustration to the material you are collecting; it also requires the interviewee to be specific and qualify sweeping statements.
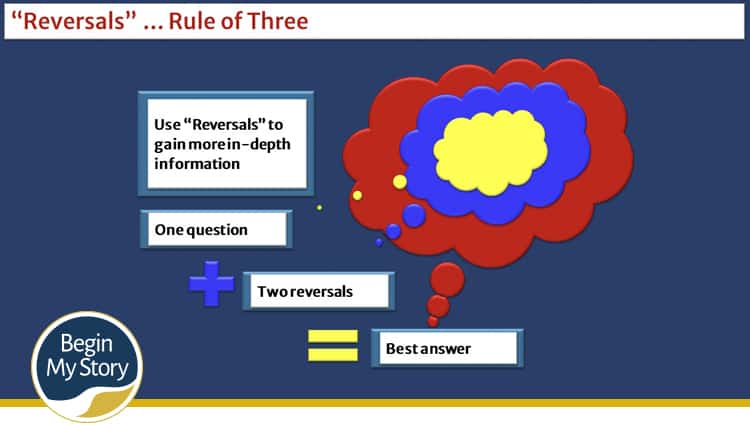
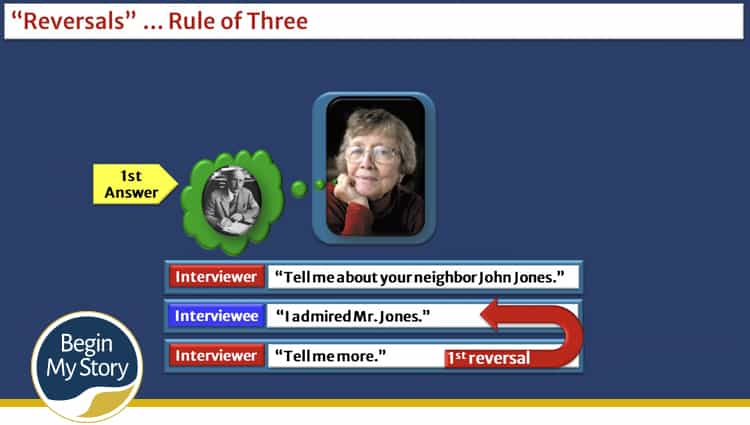
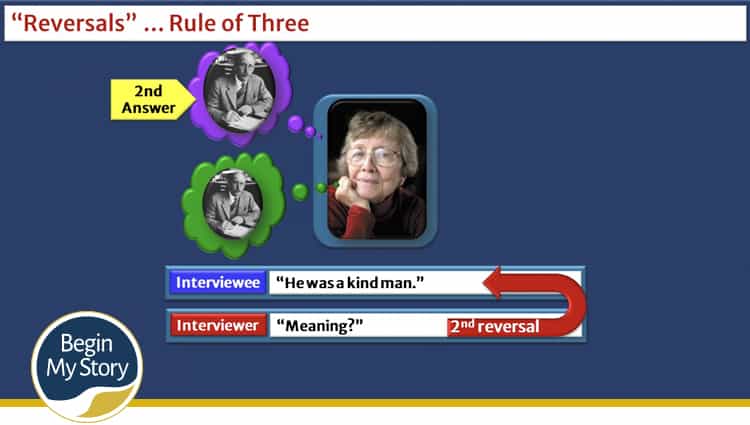
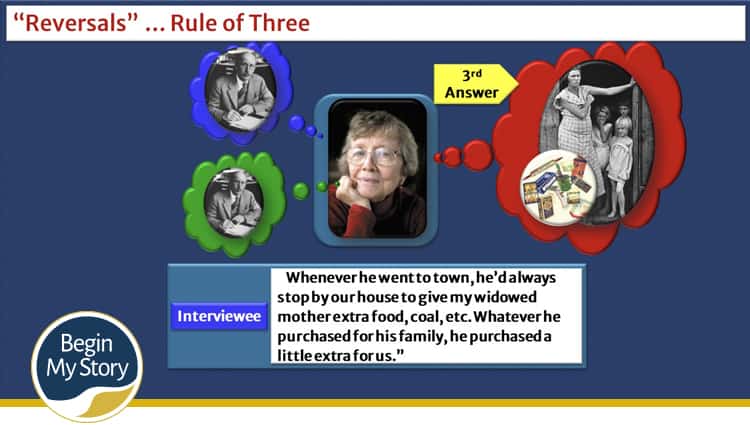
Use “reversals” to gain more in-depth information. As you interview, the interviewee will give general sentences, such as, “I thought it was a great experience,” or “Mom made a great stew,” or “That was a trying time.” Reversals are statements that say, “please tell me more” It keeps the flow of the conversation moving. The following are examples of reversals:
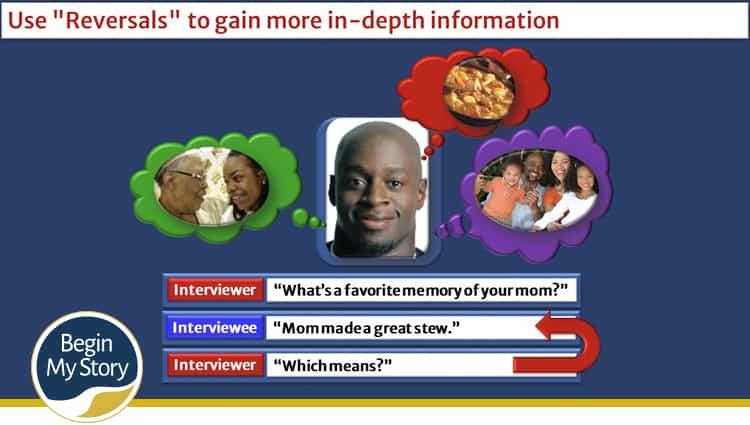
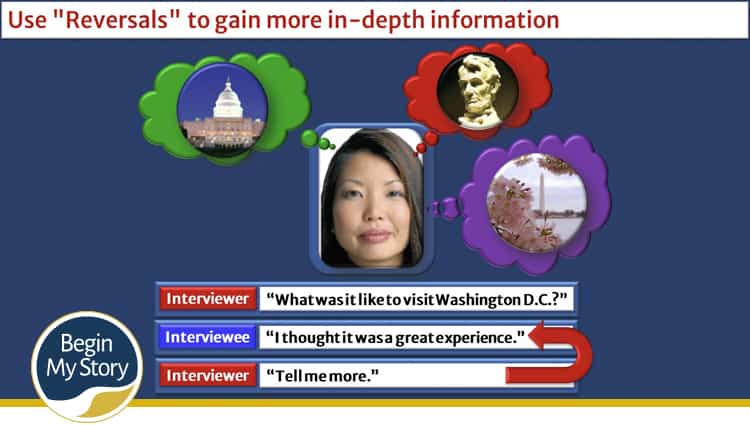
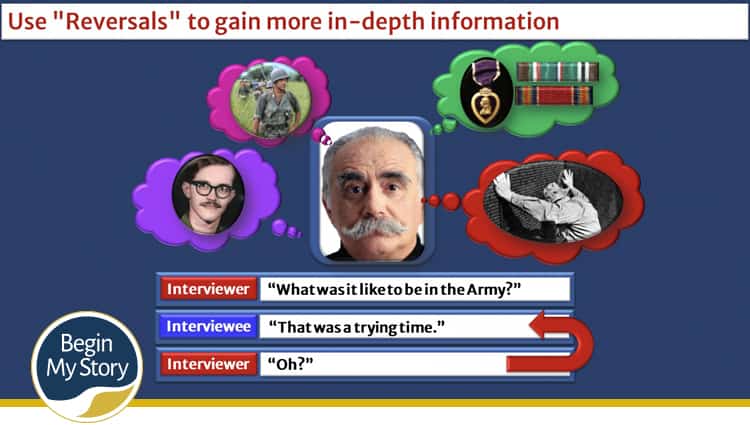
Sometimes you will need to use reversals multiple times for the same questions. I have learned that there is a rule of three for reversals. This means that you should use no more than two reversals. When an interviewee gives the third answer after the second reversal, that is as good as your answer is going to get. For example, consider the following exchange:
You are not the one being interviewed. You are there to find out information. You aim to get them to talk, not to talk to yourself. Don’t tell them the answer to a question: “So you milked the cows by hand?” Allow them to explain how they did things. Listen carefully and maintain good eye contact. Don’t contradict and don’t get into a heated debate. Respond positively—body language like nodding and smiling is much better than “ers” and “ums” and “really.” Try not to say “yes” or make encouraging noises, and don’t wriggle about or shuffle your papers.
Good interviewers don’t shine. Don’t use the Interview to show off your knowledge, vocabulary, charm, or other abilities. Good interviewers do not shine; only their interviews do.
Be sensitive and always respect confidences. Some topics may be sensitive or very personal. Be respectful of the interviewee’s feelings and sense of privacy.
Don’t interrupt. Be relaxed, unhurried, and sympathetic. Make sure that your interviewee has finished answering before you ask the next question. Don’t interrupt a good story because you have thought of a question or because the interviewee is straying from the planned outline. If the information is pertinent, let her go on, but jot down your questions on your notepad so you will remember to ask it later. Do not fill every pause they take. Most people will need to think about answers, especially if they remember things that happened long ago. Don’t worry if you seem to be straying from your prepared questions, as long as the information you are hearing is relevant. Listen carefully and maintain good eye contact.
How to manage a stray. It’s not uncommon for an interviewee to stray on a subject that is not pertinent to the discussion. Common areas to stray include family medical problems and what family children are doing. Try to pull the interviewee back as quickly as possible. For example, say, “Before we move on, I’d like to find out how the closing of the mine in 1935 affected your family’s finances. Do you remember that?” It is often problematic for a narrator to describe people. An easy way to begin is to ask her to describe the person’s appearance. From there, the narrator is more likely to move into character description.
Use your paper for notes. Jot down names or other details that you need to clarify before leaving. If the interviewee tells a story and you think of another question, don’t interrupt; jot down your thought and come back to it. Don’t sit and transcribe all of the interviewee’s answers.
Keep your questions short and precise. If your interviewee doesn’t understand what you’re asking, repeat the question or rephrase it.
Don’t expect people to remember dates. Most people won’t remember exact dates. Instead, ask, “How old were you then?” or “Was that before or after [Regensburg or Munich]?” If you have done your background research well enough, the answer should pinpoint the year.
What to do when stories are different than what you’ve heard. What do you do when the interviewee tells a story that is contrary to what you have heard? Tactfully point out to the interviewee that there is a different account of what she is describing. Start by saying, “I have heard . . .” or “I have read . . .” This is not to challenge her account but rather an opportunity for her to bring up further evidence to refute the opposing view, explain how that view got established, or temper what she has already said. If done skillfully, some of your best information can come from this juxtaposition of differing accounts.
When in doubt, don’t. If you feel awkward or uncomfortable in asking for sensitive or potentially damaging information, don’t ask. Your hesitation reminds you that there is a human being with feelings sitting right across from you. Details are important, but maintaining respect for privacy is even more critical. Sometimes, interviewees simply need a moment to compose themselves for sensitive discussions, or they may be evaluating your behavior as a decision-making factor in whether to talk openly about specific individuals or events.
Try to avoid “off the record” information. At times the interviewee will ask you to turn off the tape recorder while telling a good story. Ask the person to let you record the whole thing and promise that you will erase that portion if he asks you to after further consideration. You may have to erase it later, or he may not tell you the story at all, but once you allow “off the record” stories, he may continue with more and more, and you will end up with almost no recorded interview at all. “Off the record” information is only helpful if you are researching a subject, and this is the only way you can get the information. It has no value if your purpose is to collect information for later use by other researchers.
Ask interviewees to spell out measurements. “It was about this wide” will mean nothing to a listener. Try to get the interviewee to give a verbal estimate of size—”Oh, about three feet”—or give it yourself: “Is that about three feet?”
Don’t challenge accounts you think might be inaccurate. Try to develop as much information as possible that can be used by later researchers in establishing what probably happened. Your interviewee may be telling you quite accurately what he saw or heard. As Walter Lord explained when describing his interviews with survivors of the Titanic, “Every lady I interviewed had left the sinking ship in the last lifeboat. As I later found out from studying the placement of the lifeboats, no group of lifeboats was given another, and each lady probably was in the last lifeboat she could see leaving the ship.”
When a negative is better than a positive approach. Ask about the negative aspects of a situation. For example, in asking about a person, do not begin with a glowing description. “I know that Uncle Larry was a very generous and wise person. Did you find him so?” Few interviewees will quarrel with a statement like that even though they may have found the uncle a disagreeable person. You will get a more lively answer if you start in the negative. “Despite Uncle Larry’s reputation for good works, I hear he was a tough man for his employees to get along with.” If your interviewee admired Uncle Larry greatly, she would spring to his defense with an apt illustration of why your statement is wrong. If she did find him hard to get along with, your remark has given her a chance to illustrate some of the uncle’s more unpleasant characteristics.
Keep the recorder running. While you are recording, try not to turn off the recorder. You will not want to keep it running if you are interrupted by something such as a telephone call, but leave it running during pauses while people think. It is better to waste a little tape on irrelevant material than call attention to the tape recorder by a constant on-off operation. For this reason, I do not recommend the stop-start switches available on some microphones. If your mic has such a switch, tape it to the “on” position—then forget it.
The last two questions you should ask. In concluding the interview, ask, “Is there anything I haven’t asked that you think I should know?” and “Do you have any questions for me?”
Say thank you. At the end of an interview, it is helpful to say thank you while still recording so that listeners know the Interview has finished.
What should I do after an oral history interview is completed?
After the Interview is finished, don’t rush away. Take time to thank them and talk about yourself. It is also the time to discuss the copyright and clearance form (if you’re choosing to use one) and have them sign the form. You will often be shown some interesting old photographs or documents. Before you leave, provide an address, email and phone number where you can be contacted and make clear whether you will be returning for a follow-up interview or not. This can avert any unnecessary worry. Remember that your visitors will often significantly impact someone who has perhaps never told anyone their memories before.
When you arrive home, write a letter of thanks to the interviewee and enclose a copy of the agreement form (if used) for their records. Think critically about your Interview. Consider what was good about it and what could be improved next time. Prepare a listing of proper nouns, places, and jargon words or phrases for each interview tape. Examine an authoritative source to double-check spellings.
Are there any copyright issues related to oral history interviews?
I have not had issues regarding copyright in any of the hundreds of interviews I have conducted over the years. I always tell people to interview that the recording will only help me tell the story and share a draft of the story to review, make comments, and edit as needed. I will have them sign off that they have reviewed the narrative. I will always incorporate their comments and edits.
That said, it is essential to be aware of copyright regarding oral history interviews. Copyright issues may become a factor, even if you’re conducting an informal interview with your immediate family. According to the Oral History Association,
“Anyone who creates an original work or unique intellectual property has exclusive rights to use, distribute, and profit from that work. Laws regarding copyright will vary depending on an individual’s country or municipality. In most cases, a narrators’ oral history interviews are considered their intellectual property, for which they are either the legal owner or co-owner of copyright. Others who wish to use, distribute, or profit from the oral history interview will first need to obtain the narrator’s explicit permission, license, or copyright. For more copyright information, visit the US Copyright Office. “
Legally, both the interviewer and interviewee share the copyright to an oral history interview (an exception occurs when an interviewer is conducting the Interview as a work for hire). While copyright may never come into question, you should still protect yourself from potential copyright infringement by having both the interviewer and the interviewee sign release forms at the recording time. To learn more, do a Google search on “Oral History Copyright.”
Is there a form I can use for an Oral History copyright agreement?
Below is a sample of an oral history interview agreement that I have used over the years. To find copies of other forms, do a Google Search on “Oral History Copyright Forms.”
Oral History Interview Agreement
This interview Agreement is made and entered into this
Date: ______________by and between ______________hereinafter called “Interviewer”
and ____________________, hereinafter called “Interviewee.”
Interviewee agrees to participate in a recorded interview, commencing on or about ______________, with Interviewer in association with his or her research on ______________.
This Agreement relates to any materials originating from the interviews, namely the tape recordings of the interviews and any written materials, including but not limited to transcripts or other finding aids prepared from the tapes.
In consideration of the mutual covenants, conditions, and terms set forth below, the parties at this moment agree as follows:
Interviewee irrevocably assigns to Interviewer all his or her copyright, title, and interest in this work.
By virtue of this assignment, the Interviewer will have the right to use the Interview for research, educational, and other purposes, including print and electronic reproduction.
The interviewee acknowledges that he or she will receive no remuneration or compensation for either his or her participation in the Interview or for the rights assigned hereunder.
Interviewee understands and agrees that Interviewer may donate any and all materials to ______________upon completion of his or her research.
Interviewer agrees to honor any reasonable interviewee restrictions on the use of the Interview, if any, for the time specified below, as follows:
Interviewer and Interviewee have executed this Agreement on the date first written above.
INTERVIEWEE
_____________________________________
(Signature)
_____________________________________
(Typed or Printed Name)
_____________________________________
_____________________________________
(Address)
Date_________________________________
INTERVIEWER
_____________________________________
(Signature)
_____________________________________
(Typed or Printed Name)
_____________________________________
_____________________________________
(Address)
Date_________________________________
Return to list of topics for Complete Guide for Conducting Oral History Interviews.
11. How to Take Care of Recorded Oral History Interview
Most of the people I interviewed in the years after my mother’s death are now gone. However, I have just a little bit of them preserved in an interview recorded in a digital and video recording.
Every life is important and unique. Think about it. You have just recorded the thoughts, feelings and life stories of an individual or group. Your Interview is about the people known, the places visited, the decisions made, the opportunities lost or gained, and the spiritual, physical, and mental vitality and folly.
The following are a few of my best practices for preserving the recorded Interview.
What should I do with an oral history interview digital recording?
Once I have the digital recording completed of the oral history interview, I will save it as a WAV file. This is my master copy exactly as you recorded it. NEVER EVER edit the original recording. Make a copy of the file to use for any editing that needs to be done. I will usually make copies as MP3 files. To preserve material for the future, you need to use standard formats that computer systems recognize. Save the original as a .wav file or an AIFF, not as an MP3. WAV (or WAVE), short for Waveform audio format. Both WAVs and AIFFs are compatible with Windows and Macintosh operating systems. WAV and AIFF file formats take up considerably more space than MP3.
What should I do with an oral history interview taped recording?
If you are using a cassette or mini-cassette recorder to record the Interview, seriously consider digitizing the Interview. Digitizing the Interview will allow you to do the following:
- Back up a master copy of the Interview.
- Use audio editing software (like Audacity) to cut your favorite stories from the interviews and use them to augment family histories that are placed online.
- Cut out problems like phones ringing, dogs barking, or small talk.
- Easily transcribe and edit the Interview.
- Easily share interviews. For example, I recently interviewed a person for personal history. Shortly following the Interview, the individual passed away. This was the only voice recording the family had of the person. It was easy to make an MP3 file of the recording and share it with the family.
Save cassette tapes. If you use a cassette or mini-cassette recorder, make sure that you make a copy before using them. You will then have an original copy, which should be put aside and used for no purpose other than making further copies. When you wind and rewind your tapes, especially if you are transcribing them, this can stretch the tape and result in distorted sound. Snap out the plastic tabs on the top of the cassette to prevent the tapes from being recorded over. Do not reuse the tape on other interviews. Place it in an envelope and store it in a safe place. I write on the envelope the date and who was interviewed. I also include the equipment used, date, place, time, and any additional notes.
Should I create a transcript of every oral history digital recording?
My emphatic answer is YES. A transcript or transcription is a word-for-word written copy of an interview. Transcribing an interview provides several significant benefits, including that there is no misunderstanding of what was said in an interview.
- You can see where clarification is needed for the Interview, and you can go back to the interviewee for clarification as needed.
- Creating a word processing document allows you to search for keywords and cut and paste sections of interviews with other relevant information under topics you have designated for your life history.
- Transcription saves the wear-and-tear of the audiotapes and videocassettes, provides easy searching on a keyword in word processing, provides an easily accessible reference substitute for the recordings, and requires no special playback equipment or listening booth.
- Transcription is another form of backup for digital recording.
What is the best way to transcribe an oral history interview?
For years the only way to transcribe an Interview was to listen to a recording and type the conversation into a word processor like Word or Google docs. Today there some excellent and easy options. The following are some examples.
First option-Otter.ai. I have been using an online service called Otter.ai. Otter.ai is a Los Altos, California-based technology company that develops speech-to-text transcription and translation applications using artificial intelligence and machine learning. Its software, called Otter, shows captions for live speakers and generates written transcriptions of the speeches.
I upload an mp3 version of my oral history interview, and in less than a half-hour, I have a complete transcript of the Interview. The transcript is 95-plus percent accurate. You the ability to listen to the recording, correct text and more. I loved this service. It costs me about $10 a month. Stay for a month or longer. There are not contracts.
Second option-Microsoft Word Transcribe. The transcribe feature converts speech to a text transcript with each speaker individually separated. After your conversation, Interview, or meeting, you can revisit parts of the recording by playing back the timestamped audio and edit the transcription to make corrections. You can save the full transcript as a Word document or insert snippets of it into existing documents.
Google also has a text-to-speech option. At the time of this writing, there was a cost. Honestly, I was so pleased with Otter.ai, that I did not look too close at Google.
The third option-Dragon Naturally Speaking. Use the software Dragon Naturally listens to your voice and types the words out. Used most often by healthcare, legal and law enforcement, Dragon Naturally Speaking requires the user to record their voice imprint. This voice imprint is then used to recognize words spoken by this person. I have used the software a lot. I would listen to the interview recording in one ear and speak into the microphone with Dragon Naturally Speaking software open. It took me a day or two to get acquainted without using the software. But once I did, I could transcribe a 1-hour recording in about 2.5 hours. If you have someone who wants to tell their story, like a parent, this might be the way to go.
Fourth option-Listen and type. This is simply listening and typing what you hear in a word processor. I type around 65 words a minute. For every hour recording, it takes me 4-plus hours to transcribe. I would seriously consider Options 1-3.
How complete should the oral history interview transcript be?
The purpose of the transcript is to provide you access to critical details from the Interview. On average, I will transcribe from 40 to 70 percent of the Interview. I will focus on the question and the key answers to the questions. In my transcription, I will list the name of the interviewee, equipment used, date, time, and place of the Interview, and key highlights of the Interview.
There are portions of the Interview where “abstracting” is a great choice. Abstracting is where you will briefly tell what is being discussed and then insert word-for-word transcription as needed. For example, “Recalls where he was when WWII was declared. Describes atmosphere at home. [Now transcribe detailed explanation of feelings and so forth.].”
Use words like explains, describes, mentions, recounts, and recalls to give the researcher an idea of what is included and how much material there is on a particular topic. “Mentions how traveled to school,” for example, means that there is less information than if you had written, “Describes how traveled to school.” It is essential to choose your words carefully.
Tips for Creating and Editing Transcripts. The following are few things that I have done to improve and get the most out of oral history interview transcriptions.
- Listen to about ten minutes of the Interview before starting to transcribe.
- Transcribe what you hear. Do not put words or phrases into the interviewee’s mouth, even if what they say is awkward or ungrammatical. Do not change the word order.
- Identify Transcriber. At the beginning of the transcript, the identity who transcribed the tape edited the transcript, and the date(s) these tasks were done.
- Highlight quotes. Highlight the best potential quotes in another color (such as blue, red) by using the highlighting icon on the formatting toolbar or by highlighting with a highlighter on the hard copy. It will save you time later on.
- Title page. Include a title page with the name of the interviewee, the interviewer, and the date of the Interview. State clearly whether restrictions have been placed on any parts of the Interview.
- Formatting. When formatting the text on the page, use one-inch margins on each side of the paper, number the pages, and double-space the text.
- Identify the speaker. Identify all speakers at the start of their comments by typing their name in bolded capital letters, followed by a colon—for example, SMITH:
- Verbatim transcript. Create a verbatim transcript, but omit such expressions as “um” or “ah.” Include expressions such as “um hum” or “huh- huh” when used to mean “yes” or “no” in response to specific questions.
- Transcribe as you hear it. Do not revise the narrator’s words to force them into standard written prose. Leave any sentence fragments, run-on sentences, and incorrect grammar untouched. Commas and dashes may be used to reflect pauses in the spoken words.
- Punctuate. Punctuate so that the transcript makes sense of the words as they were spoken. Be consistent in your punctuation; don’t, for example, indicate a pause by a dash (—) in some transcripts and three dots ( . . .) in others.
- Use of periods. Put in periods at what seem to be natural sentence breaks. Transcripts with little punctuation are very difficult to read, let alone understand.
- Managing changes. If changes are made, clearly indicate when and how the transcript differs from the original tape recording.
- Use “stage directions” with care. Some may be useful to help understand what is happening; for example, “[reading from newspaper]” or “[interruption for telephone call]” may be helpful. Still, those making interpretations—such as “[laughs sarcastically] “—should be used with caution.
- Contractions. Include word contractions as they occur, such as “don’t” and “wouldn’t.”
- Question marks. Place a question mark before and after a word or phrase to indicate any uncertainty about it, such as “?destroyed?.”
- Identifying garbled sections. Identify garbled or inaudible portions of the tape. If one word is inaudible, indicate the gap with an underscore ( ).
- Inaudible sections. When multiple words are inaudible, insert ” +” or estimate the elapsed time using a time indicator, such as ” . . ..(3 seconds).”
- When done. When you are satisfied that what is on the page accurately reflects what is on the tape, type a final copy and assemble the interview file.
- If you are transcribing cassette tapes….
- Transcribing setup. It will help if you have special transcribing equipment, such as good headphones and a transcribing machine that foot pedals can operate so you can stop and rewind the tape during playback, freeing the hands for transcribing. They also play at variable speeds to enable muffled or garbled portions to be intelligible. Using an ordinary recorder will take longer. If you have access to a personal computer, it will be easier to correct mistakes, although making the first draft by hand works quite well. Manufacturers of transcribers include Sony and Panasonic, among others.
- Sides of Tape. Indicate the end of a side of the tape in capital letters—END OF SIDE ONE, TAPE ONE; BEGIN SIDE TWO, TAPE ONE.
Return to list of topics for Complete Guide for Conducting Oral History Interviews.
12. Documenting Oral History Interview and Narrative
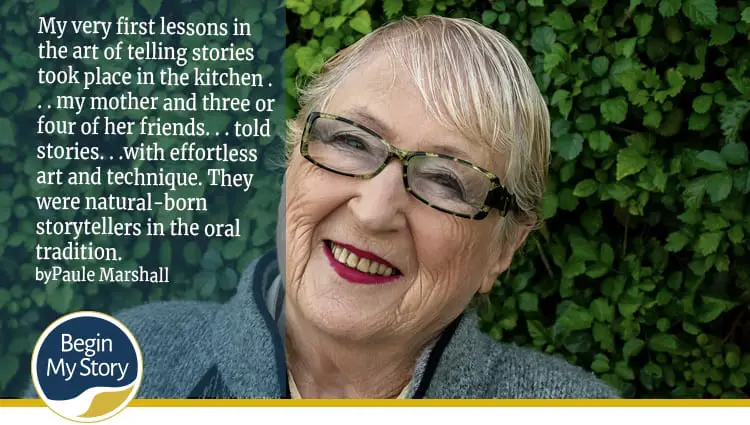
As the individual writing the individual narrative, it becomes your responsibility to collect complete, accurate, and reliable documentation, especially if you intend to incorporate the information into a book or article for distribution.
If pieces of written and oral information contradict each other, then you must go deeper to determine which is more accurate, unless contradiction is the key to the issue.
Sometimes, interviewers will recall events in the form of past conversations (“she said to me . . .”). People reconstruct dialogue not only in oral histories but also in letters and diaries, and the results can be treacherous for those wanting to publish the “truth.” When you, as the researcher and interviewer, hear such dialogue, measure the conversation with what they already know (or don’t know) about the subject and even the interviewee. Most often, you are going to need to do further research.
How do you sort out hearsay?
The interview is the cornerstone to writing narratives, yet it’s an opinion, a perception that is presented as fact. As the narrative writer, I understand the importance of documentation and additional research to confirm and effectively tell the story.
How can I add background information to the narrative?
During the research and writing of your narrative, you will have the opportunity to expand and provide background to help make the narrative richer and more inviting. Depending on your needs, consider the following:
- Public library. Take advantage of your public library and libraries in the areas where your ancestors lived. Many libraries have extensive departments with staff knowledgeable about the history and people of the region or state.
- Search genealogy and historical associations in the locales you are researching. These organizations have valuable records and dedicated people who are familiar with the history of the region.
- Use online resources—archives of source documents, places to search for ancestral information, discussion forums to share with other researchers, and blogs that offer advice, links to other resources, and opportunities to make contacts.
- Be as eager to share information as you are to obtain it. You may have a piece of information that fills a gap for someone else.
- Gather enough information to work with before you start writing, but expect to continue researching throughout the writing process.
Return to list of topics for Complete Guide for Conducting Oral History Interviews.


2 Responses
This is fantastic. I always want to glean everything from my grandparents before its too late but I never know what to ask.
Thank you Eric. I have found the questions to be really insightful and thought-provoking.